October 30, 2025
It’s the end of October. The Biblical fall feasts — described in Leviticus 23 — have come to an end, I’m back in Michigan from my Kansas/Colorado family vacation, and the seasonal, autumnal rains are giving us a break for a week. Looking out my window this morning, I knew which project I wanted to tackle.
In July, Brenden and I moved to this little homestead on the outskirts of his home town. On this property is a quaint, fenced-in garden area. Now, by the time we moved in, it was already far overgrown with grass and weeds and looked like a small slice of prairie, having been let go by the previous tenants in their busy move. However, I knew that, with some planning and hard work, the garden could be cleaned up to easily and happily serve me in the years to come.
Today’s project: whack the shoulder-tall weeds down and rake up the debris. Unfortunately, my electric weedwhacker didn’t want to cooperate and its battery died in no time, so I wasn’t able to finish, but after seeing only a third of the fenced-in area down to the ground for the first time, I’m certainly inspired to want to plan.
Kaitlyn Hirn, Greenhouse Grower
For a few years, I had the benefit of working at a greenhouse local to the area, quickly working my way up to being the Head Grower’s Assistant, and I was fully in charge of planning and fulfilling all the seeding for each season.
I frequently marveled at the resources at my disposal, from the numerous catalogs from every bulk seed company in America, to seed trays that held 100-300 seedlings each, a hopper to fill them with the soil off pallets stacked 7 feet tall, and a machine to deposit the seeds directly where they needed to be in those trays — row-by-row, 7-12 seeds at a time. It certainly wasn’t the cute little lasagna garden to feed 9 of us that I’d grown up with.
In my time working there, I learned a lot about timing, quantity, budgeting, and germination. I thank Abba regularly for that experience, especially now as Brenden and I make plans for homesteading and self-sufficiency. While I intend on blogging gradually with advice I picked up from my managers and coworkers who had been in the industry for 20+ years, today I want to focus on how we planned such a hefty operation to successfully bring many thousands of seedlings to fruition each year.
While I obviously understand that a cute little lasagna garden — or whatever garden you have — will never need to be to the same scale as my former job, I do think that much of a greenhouse’s success is in a solid plan, having the resources and ground ready and waiting, seeding more than you’ll plant, and planting more than you’ll harvest. Using these principles, we can have an amazing garden year after year.
When to plan your garden
Ah, sweet August. When you’re in the thick of weeding, starting to see the fruits of your labor, and holding your breath for the great “what on earth do I do with all these zucchini squashes?” era that comes at the end of the growing season. August is also the perfect time to begin planning for the next year’s harvest.
A wise gardener will keep a journal with planting and harvesting dates, weather patterns, pests, crop rotation schedules, repair plans, and more to look back on and adjust accordingly. A wiser gardener will also begin to plan while everything is a fresh, ongoing process. You can’t forget what happened only earlier that day. This makes it the best time to start!
What has worked — or is working — from your garden? What changes do you want to make? Is there a crop you’d like to try, a variety that didn’t do well, a pepper that didn’t turn out to be worth the money, or a location that should be used differently? How much extra time did you have that you could fill next year with some expansion, or should you cut back? That’s all extremely helpful when you hit the seed catalogs, helping to keep you from getting swept up in the romanticism of new varieties while your back pain is brushed away or forgotten.
This year, I already hit up seed sources to begin planning back in late August. I made a list of the kinds of fruits and vegetables I’d like to grow, sketched out a rudimentary idea of where I’d like to put things, made a budget, and hit up Google Sheets to do what I’d been trained to do for several years.
Mind you, if you haven’t started planning by now, it’s not too late. It’s on me for not posting in August with my advice. But October, or November, or even December isn’t too late to start. I do recommend planning while summer is fresh on the mind and before you forget what those aphids did to that nasturtium you tried this year. Don’t feel rushed to buy the seeds, but getting an idea of what you want to buy, how much of each item, and where you’ll put it is valuable to your budget and the timing of when to start.
My 2026 garden plans
This coming year, it is my intention to improve our self-sufficiency, better our health with more fresh, locally-grown produce, and help our budget off-set the garden expenses by growing extra to sell at a farmers market stand.
With these ideas in mind, I visited Baker Seeds‘ website and scrolled through their offerings. I researched varieties for their popularity, health benefits, growing difficulty, and harvest times. I weighed them against cost, then inputed the chosen varieties into a Google Sheet that I’ve made, formatting it much the same as I did at my job, then adjusting for my own needs as a home-grower.
I thought it might be beneficial to you other home-growers — especially if you’re without a system yet — if I shared my charts and methodical planning.
You can view the Google Sheets file here.
From the above link, you can access the Google Sheets template that I’ve made. Log into your Google account, and you can navigate to the top left of the screen to File > Make a Copy and name it to your liking. That file will be able to be edited as your own. Alternatively, you can go to File > Download > Microsoft Excel to make it an editable Excel file. From either Google Sheets or Microsoft Excel, you’re able to print the charts to your liking.
Using the Charts
I’ve already included 20 of the most common garden vegetables, 3 common fruits (from seed/root), 10 common herbs, and 10 common garden flowers as a starting block. Add and remove any plants or varieties to suit your own needs.

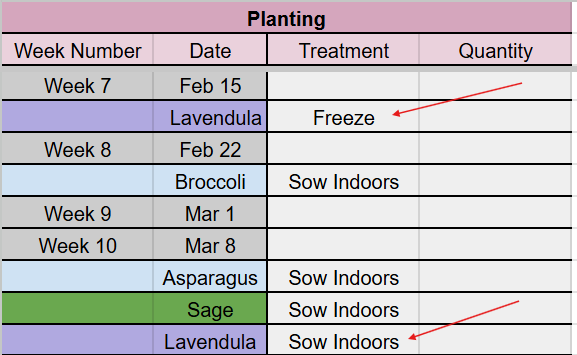
I’ve also inserted an “example” guide (pictured above) to using the charts within the Sheet itself. You can use this to act as a visual guide, but sometimes more description is helpful, too. As such, here is how I prefer to enter in my data:

- You’ll want to label each section with the type of plant you’re growing.
- I like to add the botanical name in parentheses as well, since it aids in knowing what kind of plant you’re dealing with in any scenario.
- In my charts, I’ve labeled vegetables as blue, fruits as orange, herbs as green, and flowers as purple, and I like to group them together alphabetically by these types. This is just for ease-of-use navigation, especially when scrolling through on my phone.
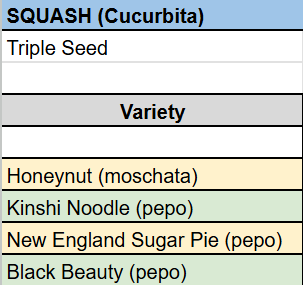
- You’ll want to then add the variety names to the Variety column. All information for each variety will be kept in the yellow or green line corresponding.
- It’s important to add all variety information given on a packet. There is a difference in the hardiness and tolerances of, say, a California Wonder green pepper, a California Wonder 300, and a California Wonder 300 TMR. If you want to buy the same thing year-to-year, having this information is useful, and it’s also useful to look into for growing ease and disease/pest information.
- If the botanical names aren’t all the same from variety to variety, I like to add the more descriptive words in parentheses here. For example, I have Squash (cucurbita), but the honeynut winter squash are cucurbita moschata, and the New England sugar pie pumpkin are cucurbita pepo. In such a case, I add the second words to the variety lines instead: honeynut (moschata), and New England sugar pie (pepo). Other plants will all be the same despite variety, such as brussel sprouts (brassica oleracea).
- You can also add an (H) or other symbol if a variety is an heirloom. This will help you know exactly which seeds to save for next year versus what will need to be purchased again.
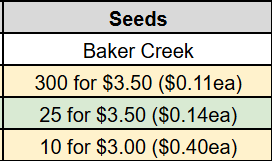
- If you know the varieties you want to grow, chances are you know a source for the seeds/seedlings. You can input that information for each variety in the Seeds column.
- I personally like to add the price per seed, as that can help me weigh the value of a plant, especially at the end of a season once I’ve seen how the plants perform.
- Knowing where you bought the seeds is also valuable, as it helps you know next year whose seeds did well and whose did not, how well-priced the seeds were, and saves time in finding sources year-to-year.
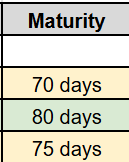
- You’ll want to add the days to maturity in the Maturity column. This will help the next few steps. If there’s a range, you can either add the range or just the longest number, shortening 55-75 days to just 75 days.
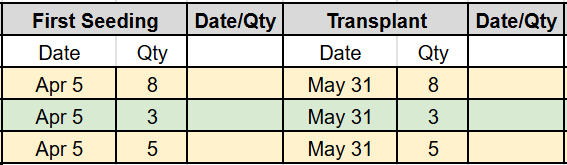
- Using the information you now have (and I will go more into finding start dates below), you can begin to add sowing dates for each crop seeding into First Seeding and/or Transplant.
- Add your quantities of each plant into the Qty sub-columns. You’ll need to know how much space is in your garden, how much time/help you have to tend your garden, and how much time/space/help you have to process or sell your harvest.
- I recommend having a drawing or plan to know what you’re putting where, and in what quantity. Research each plant to get an idea of how much one plant will produce.
- I also recommend sowing 1-5 more seedlings than you’ll plant, and planting 1-5 more seedlings than you expect to harvest from. This will ensure a more fruitful harvest if plants die or don’t germinate.
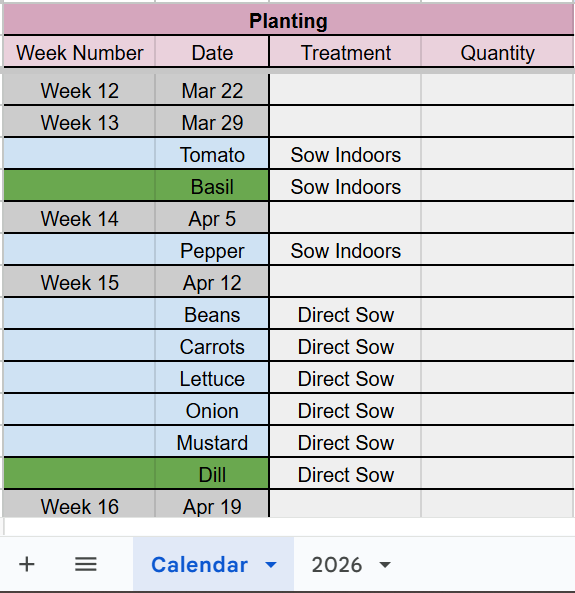
- Using the calendar provided on the other page of the Sheet, you can add your plant and the intended treatment to the planned dates and their corresponding week numbers, ensuring that you have an idea and plan each week for what needs to be planted.
- If you’re unsure you’ll get everything done, you can spread out a heavy-loaded week (like the first week after Memorial Day) into two weeks, prioritizing the plants you most look forward to eating/selling.

- Taking these week numbers, add them back to the Week section of your chart. This allows you to reference the information at a glance.
- Having it listed here also ensures you won’t accidentally miss a crop seeding or transplant date, since human error may cause you to forget to add it to the calendar or to enter the data incorrectly. It happens when planning something over a long period, especially with so many points of data entry, and it’s helpful to have the information in two spots.
- You can use this to skim the document and find all crops pertaining to the week you’re on.

- Now you can add any helpful notes to the white space between the plant title and the varieties.
- I like to add notes as to how many seeds to use per cell, if things are being sown directly in the garden, if the seeds should remain uncovered, if the seeds need to be soaked overnight before sowing (like beans and peas might), or put into the freezer for a few days or weeks for stratification. I added already some information to the plants in the file that I’ve encountered with poor germination rates, making notes to double- or triple-seed each container or cell. You can follow these or not, to your taste.
- If a treatment lasts more than a day or two, it is recommended to add soaking and freezing seeds to the calendar page as well, as it will push back the seeding dates if it gets missed or forgotten.

- Finally, when you begin to use the charts and seed your crops, don’t forget to enter in the date and quantity you planted in the Date/Qty column. This information will help you keep track of germination times and percentages.
- If a crop is taking too long to germinate, or the germination rate/percentage is very low, you can add an impromptu Second Seeding to the chart and your garden to get a better result in your harvest.
- This information also helps you in future years with planning.
You can always print the charts to insert into a binder if you prefer. Make changes to your file as suits your needs!
Calculating Sowing and Transplant Times
Once you know what you want to plant, you only have to “rush” to know the sowing dates for autumn-planted things like perennials and bulbs, since you’ll want to make sure you have the seeds and bulbs in the house to plant them on time. The rest can be calculated or edited as you have time before February.
Firstly, you’ll want to look up frost dates local to your area. Plants like daffodils, garlic, and perennial wildflowers should be sown and buried 6-8 weeks before the last frost of the year — consider about the time wild plants are dropping their seeds. You can count backward from the estimated first frost date, then add that date to the corresponding plants. Don’t forget to add it to the calendar, too, so you have your summary of each week at a glance. Around here in central Michigan (zone 5b), it’s mid-October, typically.
For spring-planted things, planting times get a little trickier. It matters more plant-to-plant, and it matters greatly on temperatures outdoors. What I like to do is think about each plant’s days to harvest (you can find this on seed packets and websites) and weigh that against the estimated last frost date, which around here is Memorial Day. This gives me an idea of what can’t wait to be planted directly in the ground versus what can. If you want tomatoes and peppers at your 4th of July picnic, you’ll have to start them indoors, as their maturity times are around 80 days (or even longer for the especially hot peppers), whereas something like, say, green beans is only 65 days.
On the flipside, you also should weigh each type of plant. Carrots, for example, are a taproot and don’t like to be transplanted, so your harvest will be better if you sow them directly. However, squash transplant very well, so long as you allow them to root in their starter pots, which usually takes 4-6 weeks from germination, depending on environmental temperature and light. Allowing a good root structure to form is key to any successful transplanting.
The final thing to weigh is cold-hardiness. Lettuces and brassicas are known for bolting when it gets hot, preferring to grow when the days are cooler and the sun is less intense. This means that they may do better being planted outdoors before the end of the frosting season, so long as you’re careful to cover them on cold nights to protect against the frost. (You can make up for their intolerance to heat by planting another crop at the end of summer, once things are beginning to cool down again.) Carrots, onions, and other root vegetables can be treated much the same way, doing well outdoors early so long as their leaves get covered, since their sturdy root structure is kept insulated by the ground.
When in doubt, ask a seasoned gardener, your local greenhouse grower, Google, or look it up in gardening reference books. (Some books I like to use are The Complete Book of Growing Plants from Seed by Elda Haring, Gardener’s Handbook by L.H. Bailey, and 10,000 Garden Questions Answered by Experts, originally edited by F.F. Rockwell, but my two volumes are edited by Marjorie J. Dietz.) After one or two seasons of keeping a gardening journal of your own personal experiences, I have every confidence that you’ll be a master at it yourself.
Note: The above book links are Amazon affiliate links.
Looking forward to planting
Now it’s on to the hardest part: waiting for spring. Oftentimes, it can help to gather materials you know you’ll need, sharpening your garden tools, making a plan for starting seeds indoors (where, when, and how), and deciding on things such as what kind of trellising you want to use or what you plan to use against pests.
I recommend making it a family affair! If you have kids, let them choose which plant is “theirs” to take care of (under your watchful eye), or include them in the planting or watering processes.
As for me, my weedwhacker’s battery is probably charged by now, and I’ll be heading back outside to clear away the remaining weeds and their seeds that will undoubtedly be a nuisance to me next summer. Come along with me and see the work-in-progress on my Facebook page! I’d love to see your garden layouts as well.
Until Abba lays a new topic on my heart,

Leave a Reply